Have you ever wondered how CSS Flexbox works? We clearly explain the possibilities of technology using animation.
How CSS FlexBox works: Visual introduction to the system of layout of elements on a web page
CSS Flexbox is a technology for creating complex flexible layouts due to the correct placement of elements on the page. They write about the technology itself here. We decided to explain the capabilities of CSS Flexbox using gifs.
Note you read the improved version of the article we once released.
Display: Flex
It contains 4 DIV different sizes that are inside the Gray DIV. Each DIV has a Display: Block. Therefore, each block occupies the entire width of the line. To start working with CSS Flexbox, you need to make a container a FLEX container. This is done like this:
So the blocks have a property of FLEX context, which in the future will allow them to control much easier than using the standard CSS.
Flex-Direction
The FLEX container has two axes: the main and perpendicular to it.
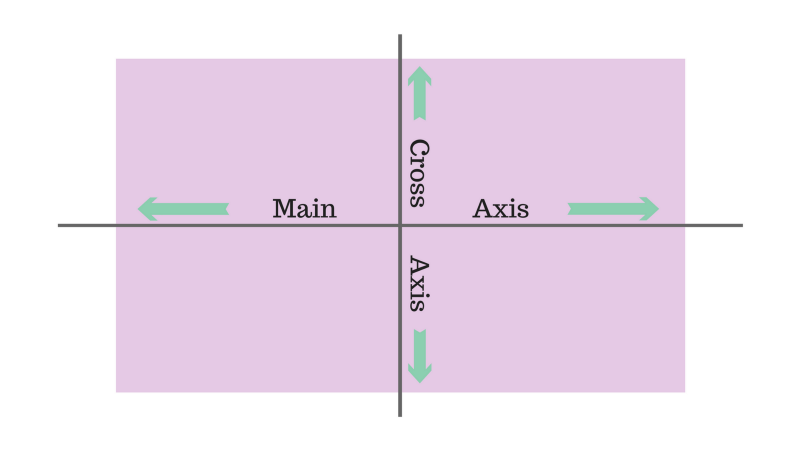
By default, all objects are located along the main axis – from left to right. That is why the blocks in the previous example lined up in the line when we used Display: Flex. But Flex-Direction allows you to rotate the main axis.
Please note that Flex-Direction: Column does not eve on the blocks on the axis perpendicular to the main one. The main axis itself changes its location, and is now directed from top to bottom.
There are also a couple of properties for Flex-Direction: Row-Reverse and Column-Reverse.
Justify-Content
Is responsible for aligning the elements along the main axis:
Justify-Content can take 5 values:
- FLEX-START
- Flex-End
- Center
- Space-Between
- Space-AROUND
Space-Between sets the same distance between the blocks, but not between the container and the blocks. Space-ARound also sets the same distance between the blocks, but now the distance between the container and blocks is equal to half the distance between the blocks.
Align-Aitems
If Justify-Content works with the main axis, then Align-Aitems works with an axis, perpendicular to the main axis. Let's get back to FLEX-Direction: ROW and go to Align-ITEMS commands:
- FLEX-START
- Flex-End
- Center
- Stretch
- Baseline
It is worth noting that for align -items: Stretch the height of the blocks should be AUTO. For Align-Aitems: Baseline, the paragraph tags do not need to be removed, otherwise it will turn out like this:

To better understand how the axes work, combine the Justify-Content with Align-Vitems and see how the alignment in the center works for two properties of FLEX-Direction:
Align-Self
Allows you to align the elements individually:
For two blocks, Align-Self is applicable, and for the rest-Align-Aitems: Center and Flex-Direction: Row.
Flex-Basis
Is responsible for the initial size of the elements before they are changed by other properties of CSS Flexbox:
Flex-Basis affects the size of the elements along the main axis. Let's see what will happen if we change the direction of the main axis:
Note that we had to change the height of the elements: Flex-Basis can determine both the height of the elements and their width depending on the direction of the axis.
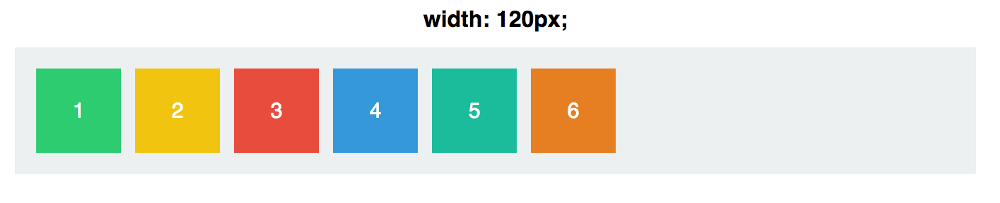
Flex-Grow
This property is a little more complicated. First, set the blocks of the same width of 120px:
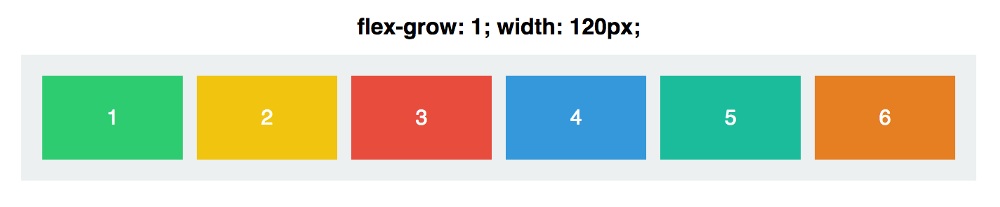
By default, the FLEX-GROW value is 0.This means that blocks are forbidden to increase in size. We set the FLEX-GROW equal to 1 for each block:
Now the blocks took the remaining place in the container. But what does FLEX-GROW mean: 1? Let's try to make Flex-Grow equal to 999:

And … nothing happened. It happened due to the fact that Flex-Grow accepts not absolute values, but relative. This means that it does not matter what significance FLEX-Grow has, it is important what it is in relation to other blocks:
At first, the FLEX-GROW of each block is 1, in total it will turn out 6. So our container is divided into 6 parts. Each block will occupy 1/6 part of the available space in the container. When the Flex-Grow of the third block becomes 2, the container is divided into 7 parts: 1 + 1 + 2 + 1 + 1 + 1. Now the third block takes 2/7 of the spaces, the rest-1/7. Etc.
Flex-Grow works only for the main axis until we change its direction.
FLEX-SHRINK
The direct opposite of Flex-Grow. It determines how much the block can be reduced in size. Flex-Shrink is used when the elements do not fit into the container. You determine which elements should decrease in size, and which do not. By default, the FLEX-SHRINK value for each block is 1. This means that the blocks will be compressed when the container will decrease.
We set the FLEX-Grow and FLEX-SHRINK 1:
Now we will change the value of FLEX-SHRINK for the third block by 0. It was forbidden to contract, so its width will remain equal to 120px:
FLEX-SHRINK is based on proportions. That is, if the first FLEX-SHRINK block is 6, and the rest of it is 2, then this means that the first block will be compressed three times faster than the rest.
Replaces Flex-Grow, Flex-Shrink and Flex-Basis. Default values: 0 (Grow) 1 (shrink) Auto (Basis).
Create two blocks:
Both have the same Flex-Basis. This means that both will be 300px wide (container width: 600px plus Margin and Padding). But when the container begins to increase in size, the first block (with a large Flex-Grow) will increase twice as fast, and the second block (with the largest flex-scrink) will be compressed twice as fast:
You can find even more properties in an animated guide to CSS Flex.
Additionally
How does the size change with CSS Flexbox?
When the first block increases, it does not become twice as much as the second, and when the second decreases, it also does not become half the first. This is due to the fact that Flex-Grow and Flex-Schrink are responsible for the growth rate and reduction.
A little mathematics
The initial size of the container: 640px. We subtract 20px on each side for Padding, and we will have 600px for two blocks. When the container width becomes equal to 430px (loss of 210px), the first block (Flex-Shrink: 1) loses 70px. The second block (Flex-Shrink: 2) loses 140px. When the container is compressed to 340px, we lose 300px. The first block loses 100px, the second – 200px. The same thing happens with Flex-Grow.
If you are also interested in CSS Grid, you can familiarize yourself with our article, where we consider Flexbox and Grid.